In this document
ChequoHub and cash drawers
This guide is for the owner or manager setting up the hardware. It covers pairing a ChequoHub from a tablet, adding your cash drawers in the back office, and choosing which drawer each tablet opens. You do each of these once.
What a ChequoHub is
A ChequoHub is a small box that sits on your Wi-Fi. It opens a cash drawer without needing a thermal printer to do it, and it sends print jobs to your network printer, so printing keeps working when no tablet is to hand.
You don't need a ChequoHub if your cash drawer is plugged into a receipt printer. In that case, skip to the back office section below.
Pair a ChequoHub from a tablet
Pairing needs the Manage printers permission, which managers and owners have by default. Anyone else sees Ask a manager to add a ChequoHub. where the button would be.
Before you start, plug the ChequoHub in near where it will live, and have your restaurant's Wi-Fi password to hand. The tablet will leave your Wi-Fi for a minute during setup, so do it while no one needs that tablet for orders.
- On the Tables screen, tap the three-dot button at the top right and choose Settings.
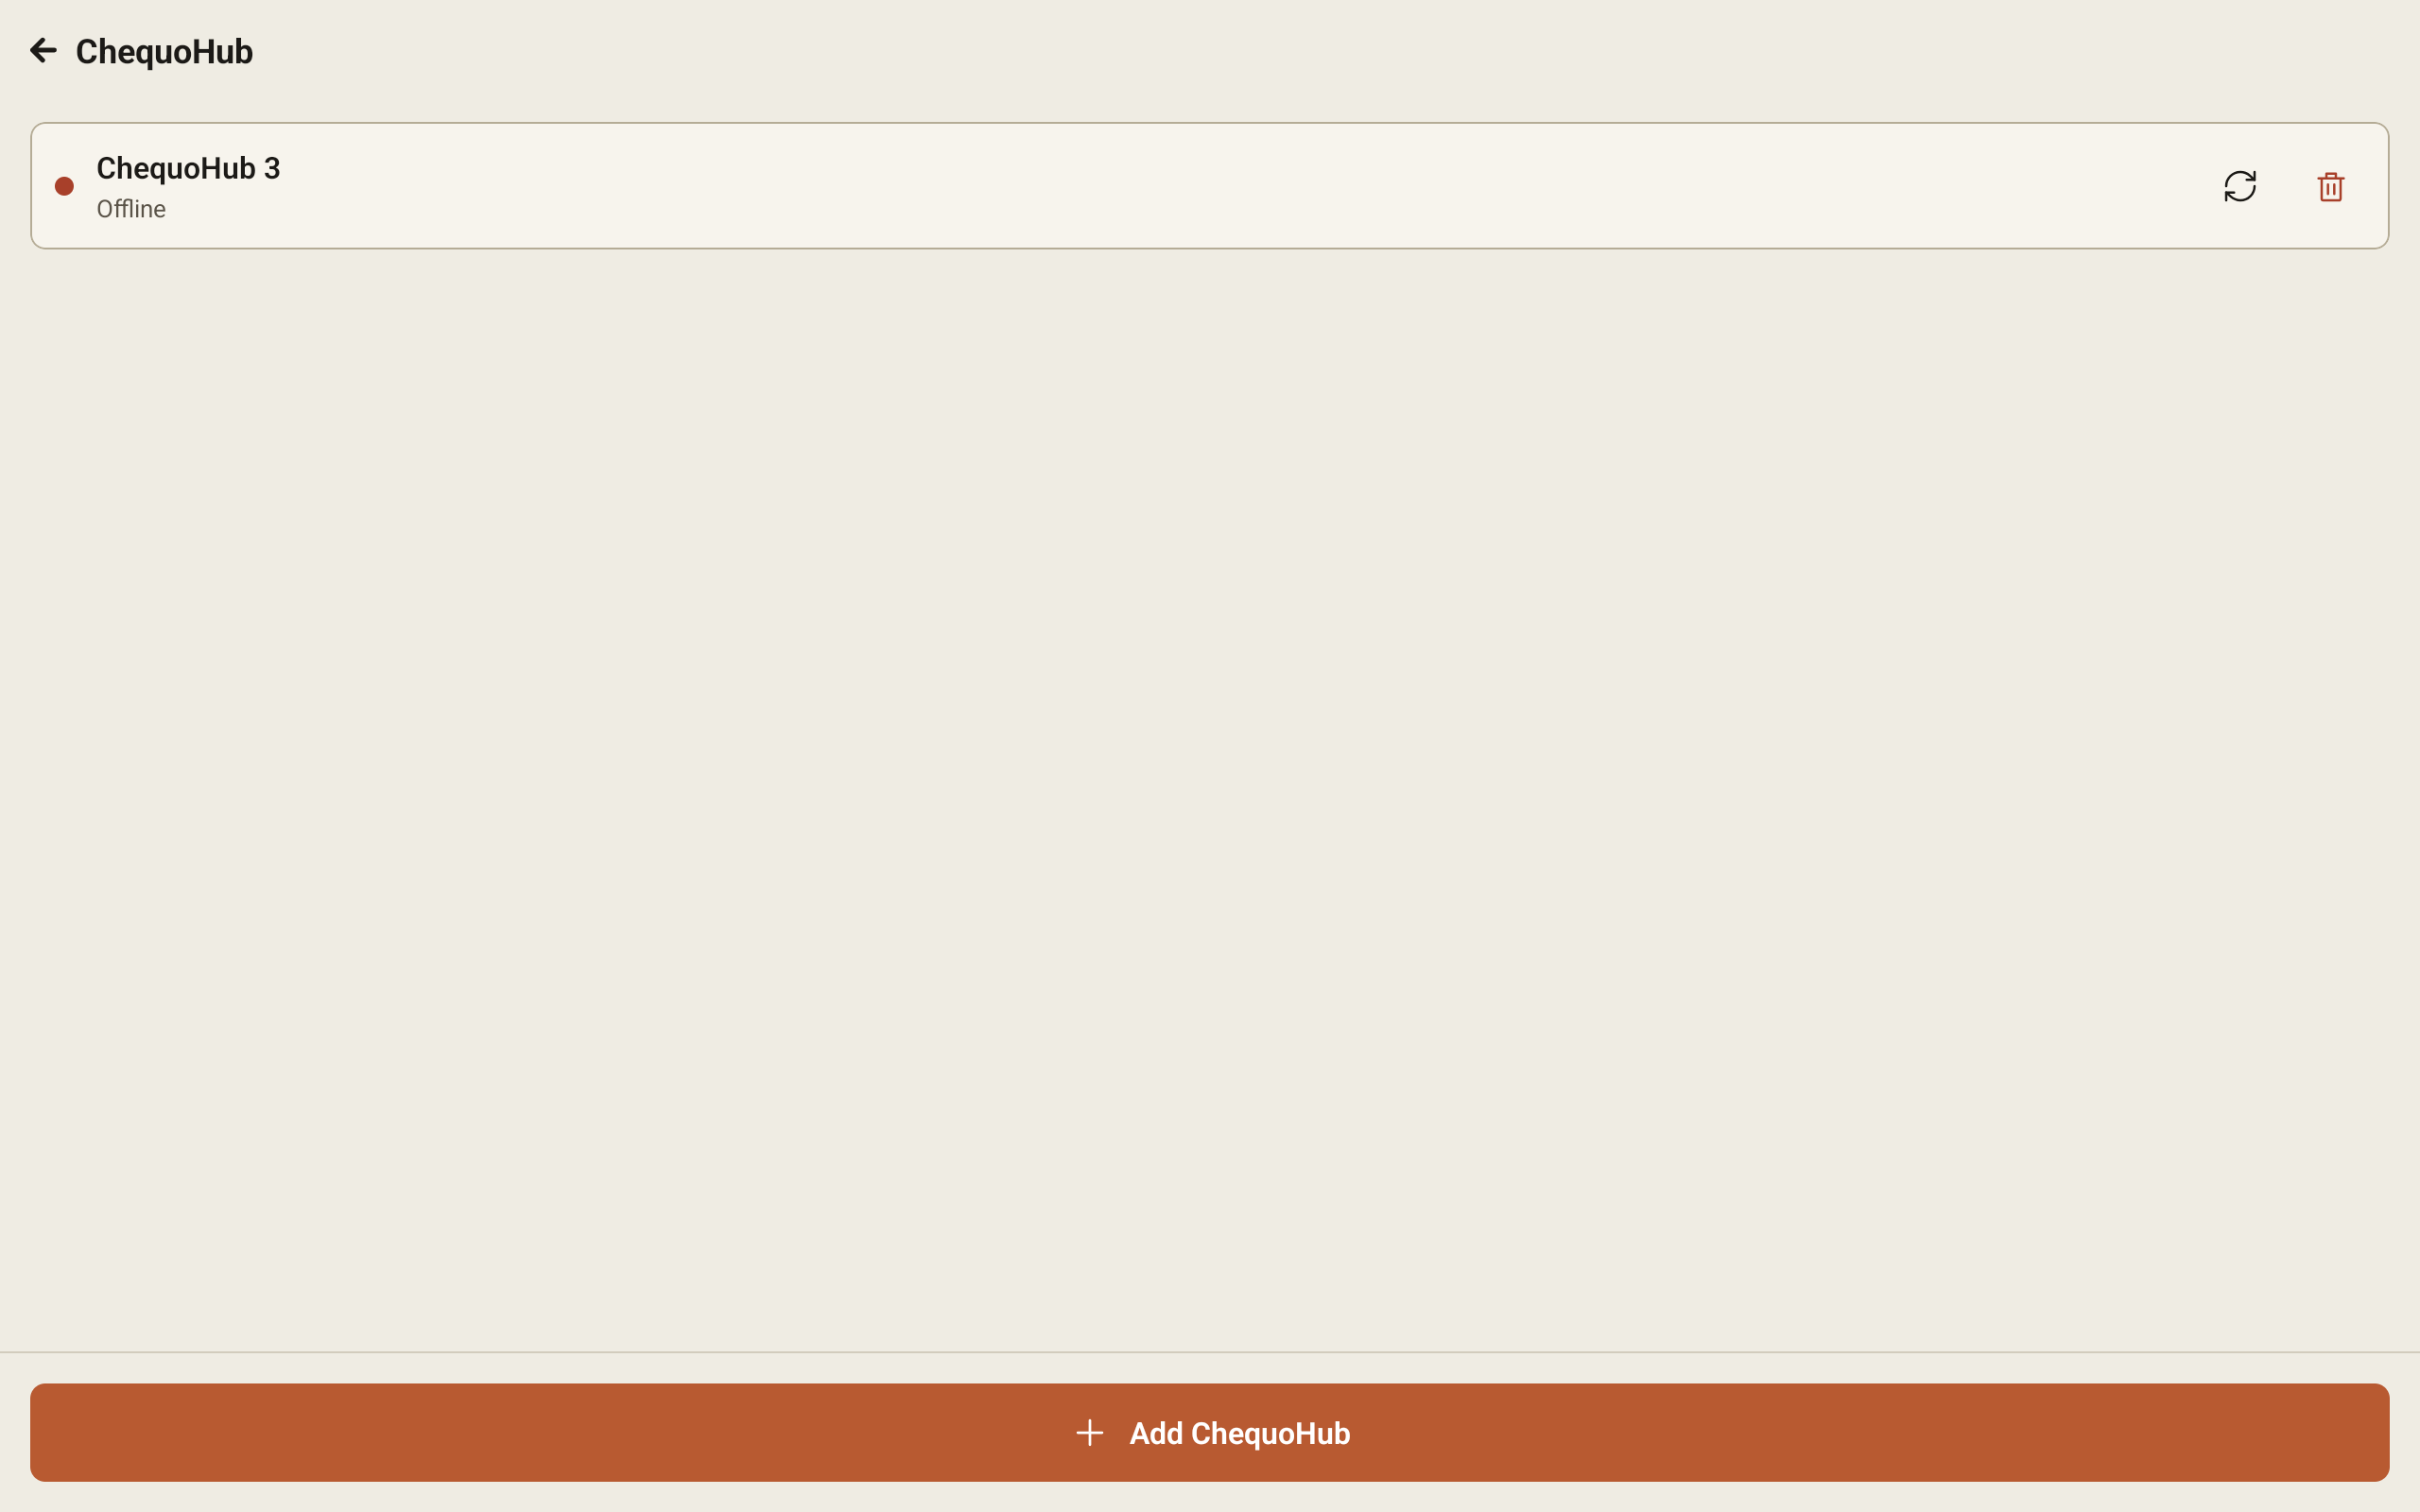
- Tap ChequoHub. With no hub paired yet, the screen explains what a ChequoHub does. Otherwise it lists each paired hub with its status.
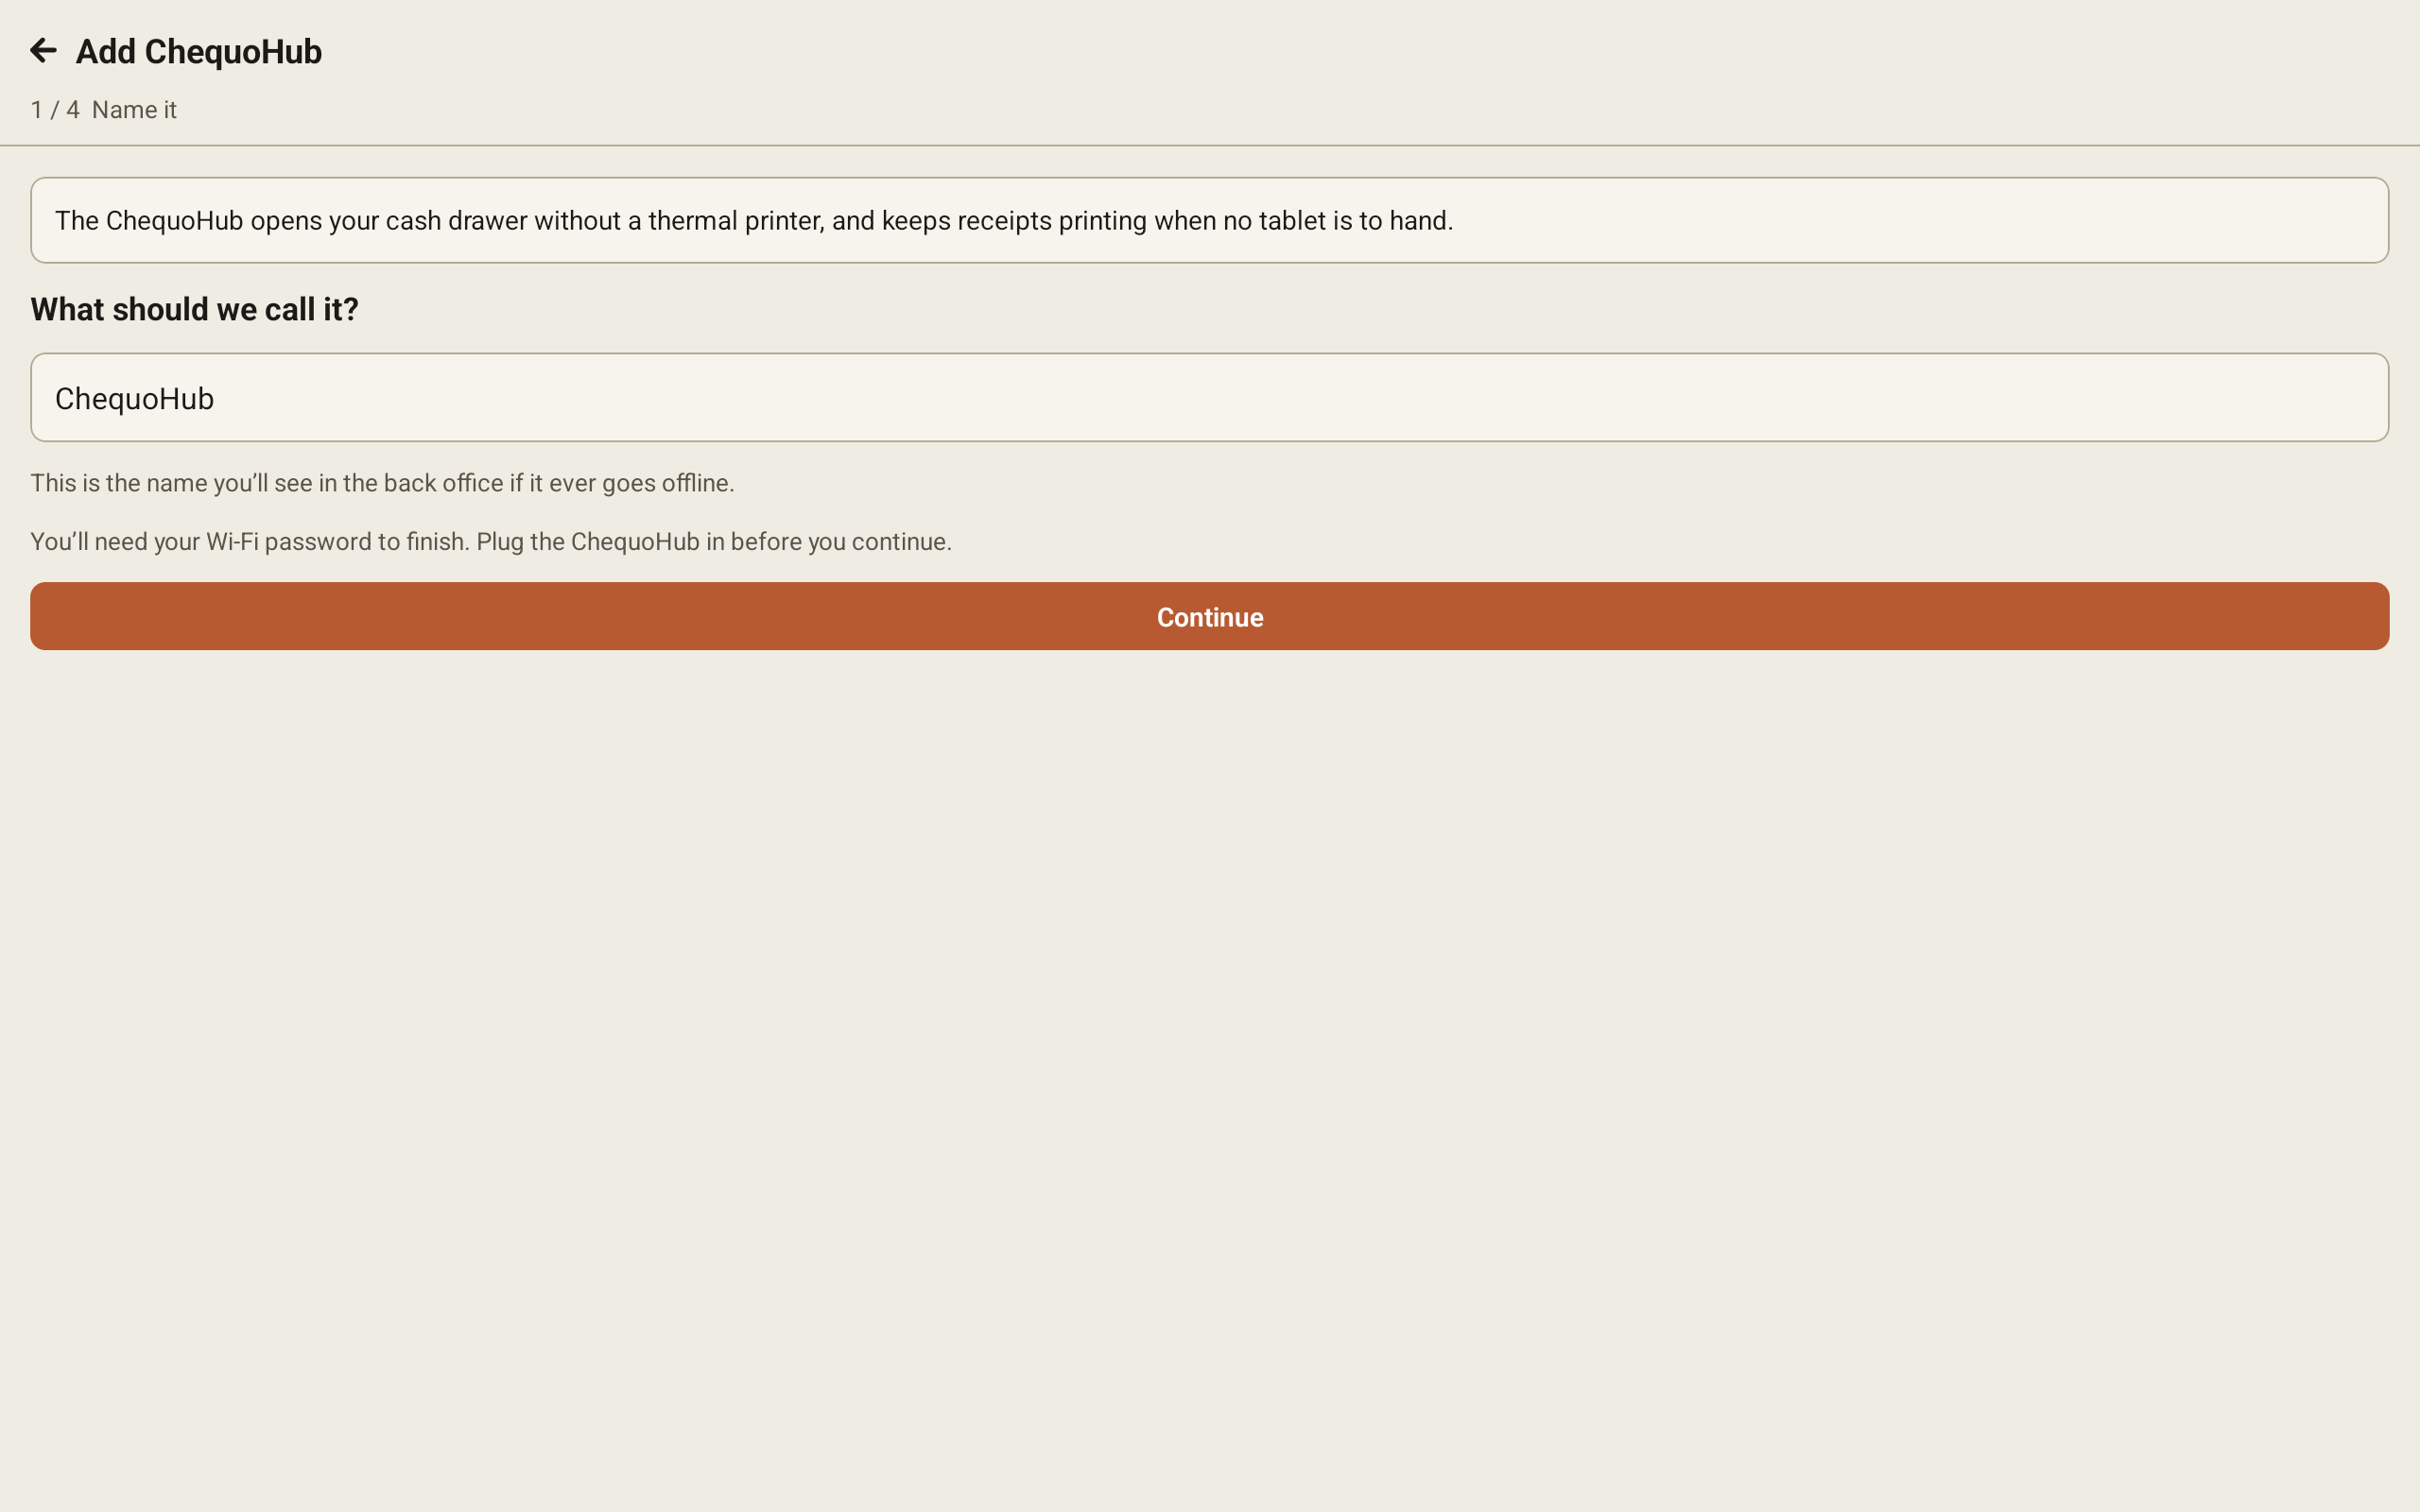
- Tap Add ChequoHub. The setup has four steps, and the current one is shown at the top of the screen.
Step 1: Name it
- Under What should we call it?, keep the suggested name or type your own, such as the place it sits. This is the name you'll see in the back office.
- Tap Continue.
Step 2: Connect to it
The ChequoHub has its own small Wi-Fi network for setup. Its name starts with ChequoHub-. That network has no internet, which is expected.
- Tap Open Wi-Fi settings.
- Join the network that starts with ChequoHub-. If the tablet asks whether to stay connected to a network with no internet, choose to stay.
- Come back to Chequo. The app finds the ChequoHub by itself and moves on to the next step.
If the app can't find it, the screen shows what to try. The most common causes:
- The tablet is still on your restaurant Wi-Fi, or has switched to mobile data. Check you joined the ChequoHub- network, and turn mobile data off.
- The ChequoHub was set up before. A ChequoHub that is already working does not show a setup network. Hold its BOOT button for 10 seconds to bring the setup network back.
- It is unplugged, or too far away. Check the power and move closer.
Step 3: Choose Wi-Fi
- Under Which Wi-Fi should it use?, tap your restaurant's Wi-Fi in the list. These are the networks the ChequoHub itself can see.
- Type the password into Wi-Fi password.
- Tap Send to ChequoHub.
If the ChequoHub can't list networks, the step shows a Network name field instead: type your Wi-Fi name exactly as it appears on your router.
If the list is empty, the ChequoHub can't see any Wi-Fi from where it is. Move it closer to your router and try again.
Step 4: Finish
The ChequoHub restarts and joins your Wi-Fi.
- Put the tablet back on your restaurant Wi-Fi. Open Wi-Fi settings takes you there.
- Come back to Chequo and wait. When the ChequoHub checks in, the screen shows its name followed by is online.
- Tap Done.
If it doesn't check in, the Wi-Fi password may be wrong, or the ChequoHub may be too far from the router. Wait about five minutes, until it opens its setup network again, then tap Try again to go back to step 2. To give up instead, tap Remove this hub.
Check on a paired ChequoHub
Each ChequoHub on the ChequoHub screen shows a coloured dot and one word under its name:
- Online: it is connected and working.
- Offline: it has not been heard from recently. Check it is plugged in and your Wi-Fi is up.
- Setup never finished: someone started pairing it and stopped. Pair it again, or remove it.
A manager also sees two buttons on each row. The circular arrows reconnect the ChequoHub: you join its setup network and choose Wi-Fi again, without renaming it. If it is online, the app warns you first that it stops working until setup finishes. The bin removes it: confirm with Remove, and it stops opening the cash drawer and stops printing.
Add your cash drawers in the back office
In Chequo, a cash drawer is its own device, with its own name. You add each one in the back office, and say what opens it.
- Sign in to the back office and click Cash drawers in the sidebar, just below Printers.
- In Add a cash drawer, type a Name your staff will recognise, such as the counter it sits under.
- Under Opened by, choose one:
- A thermal printer, for a drawer plugged into a receipt printer. Then choose that printer under Printer.
- A ChequoHub, for a drawer plugged into a ChequoHub. Then choose the hub under Device. A ChequoHub drawer needs the internet to open. A drawer wired to a printer keeps working during an outage.
- The till itself, for a drawer built into the till. Then choose that till under Device.
- Click Add cash drawer.
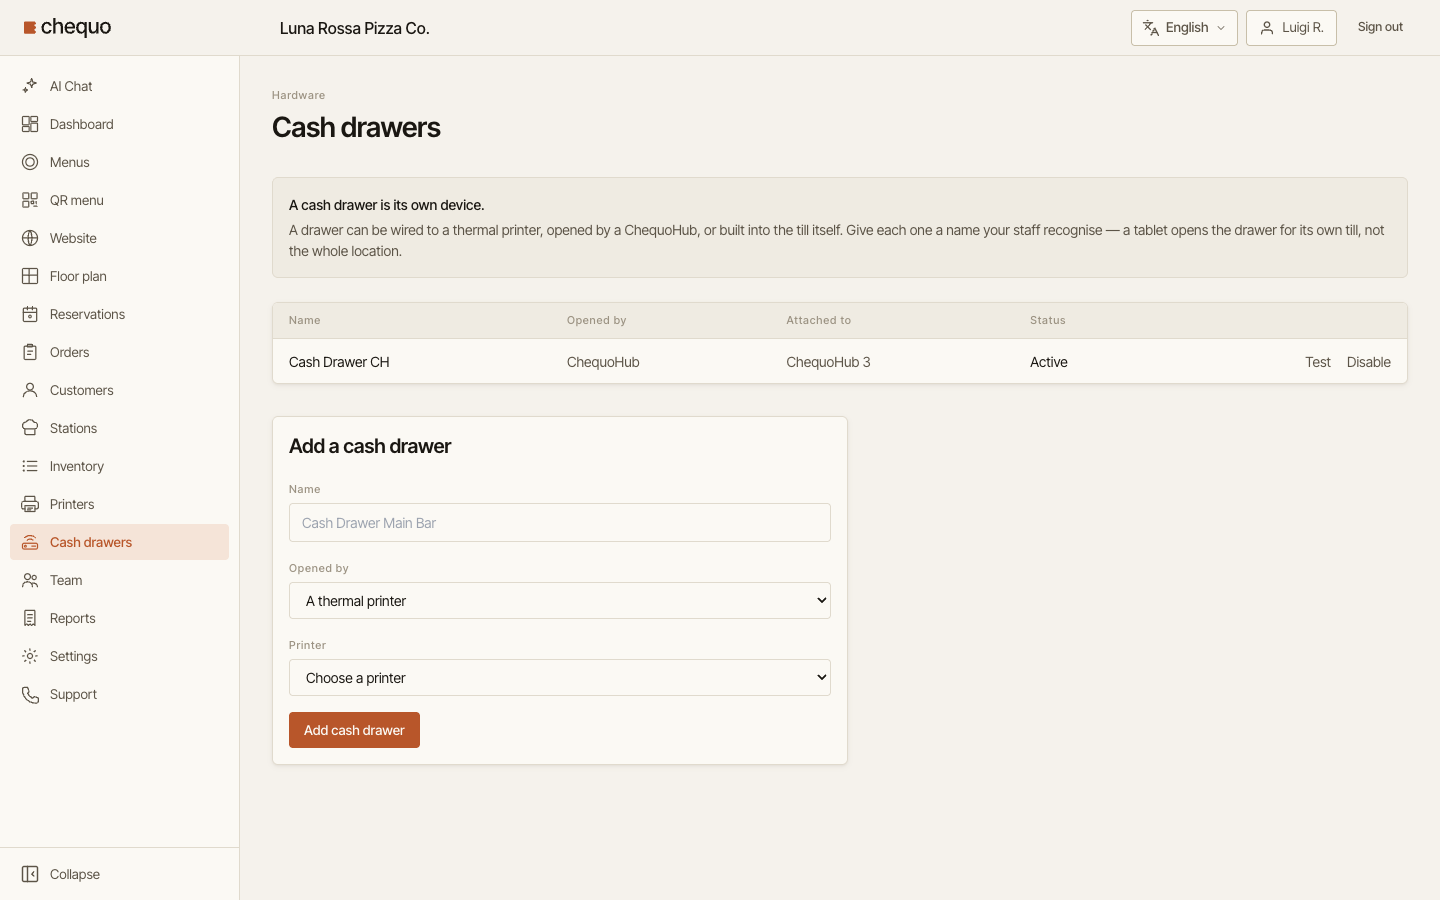
The drawer appears in the list, with what opens it and what it is attached to. A drawer opens when a payment with cash in it is taken.
For a ChequoHub drawer, click Test on its row to open it from the back office and check the wiring. It opens within a second if the ChequoHub is online.
To stop using a drawer without deleting it, click Disable on its row. Enable brings it back.
Choose which drawer a tablet opens
Each tablet opens one drawer, its own till's. You don't have to set this when there is only one drawer, or when the drawer is wired to the printer chosen on this tablet's Printers screen. The tablet works that out by itself.
Set it when you have more than one till, or when a tablet prints in one place and takes change from another. For example, a tablet can print at the terrace and take change from the main counter.
- On the tablet, tap the three-dot button and choose Settings.
- Tap Cash drawer.
- Tap the drawer this tablet should open, or tap Automatic to let the tablet decide. Under Automatic, the screen shows which drawer that currently means.
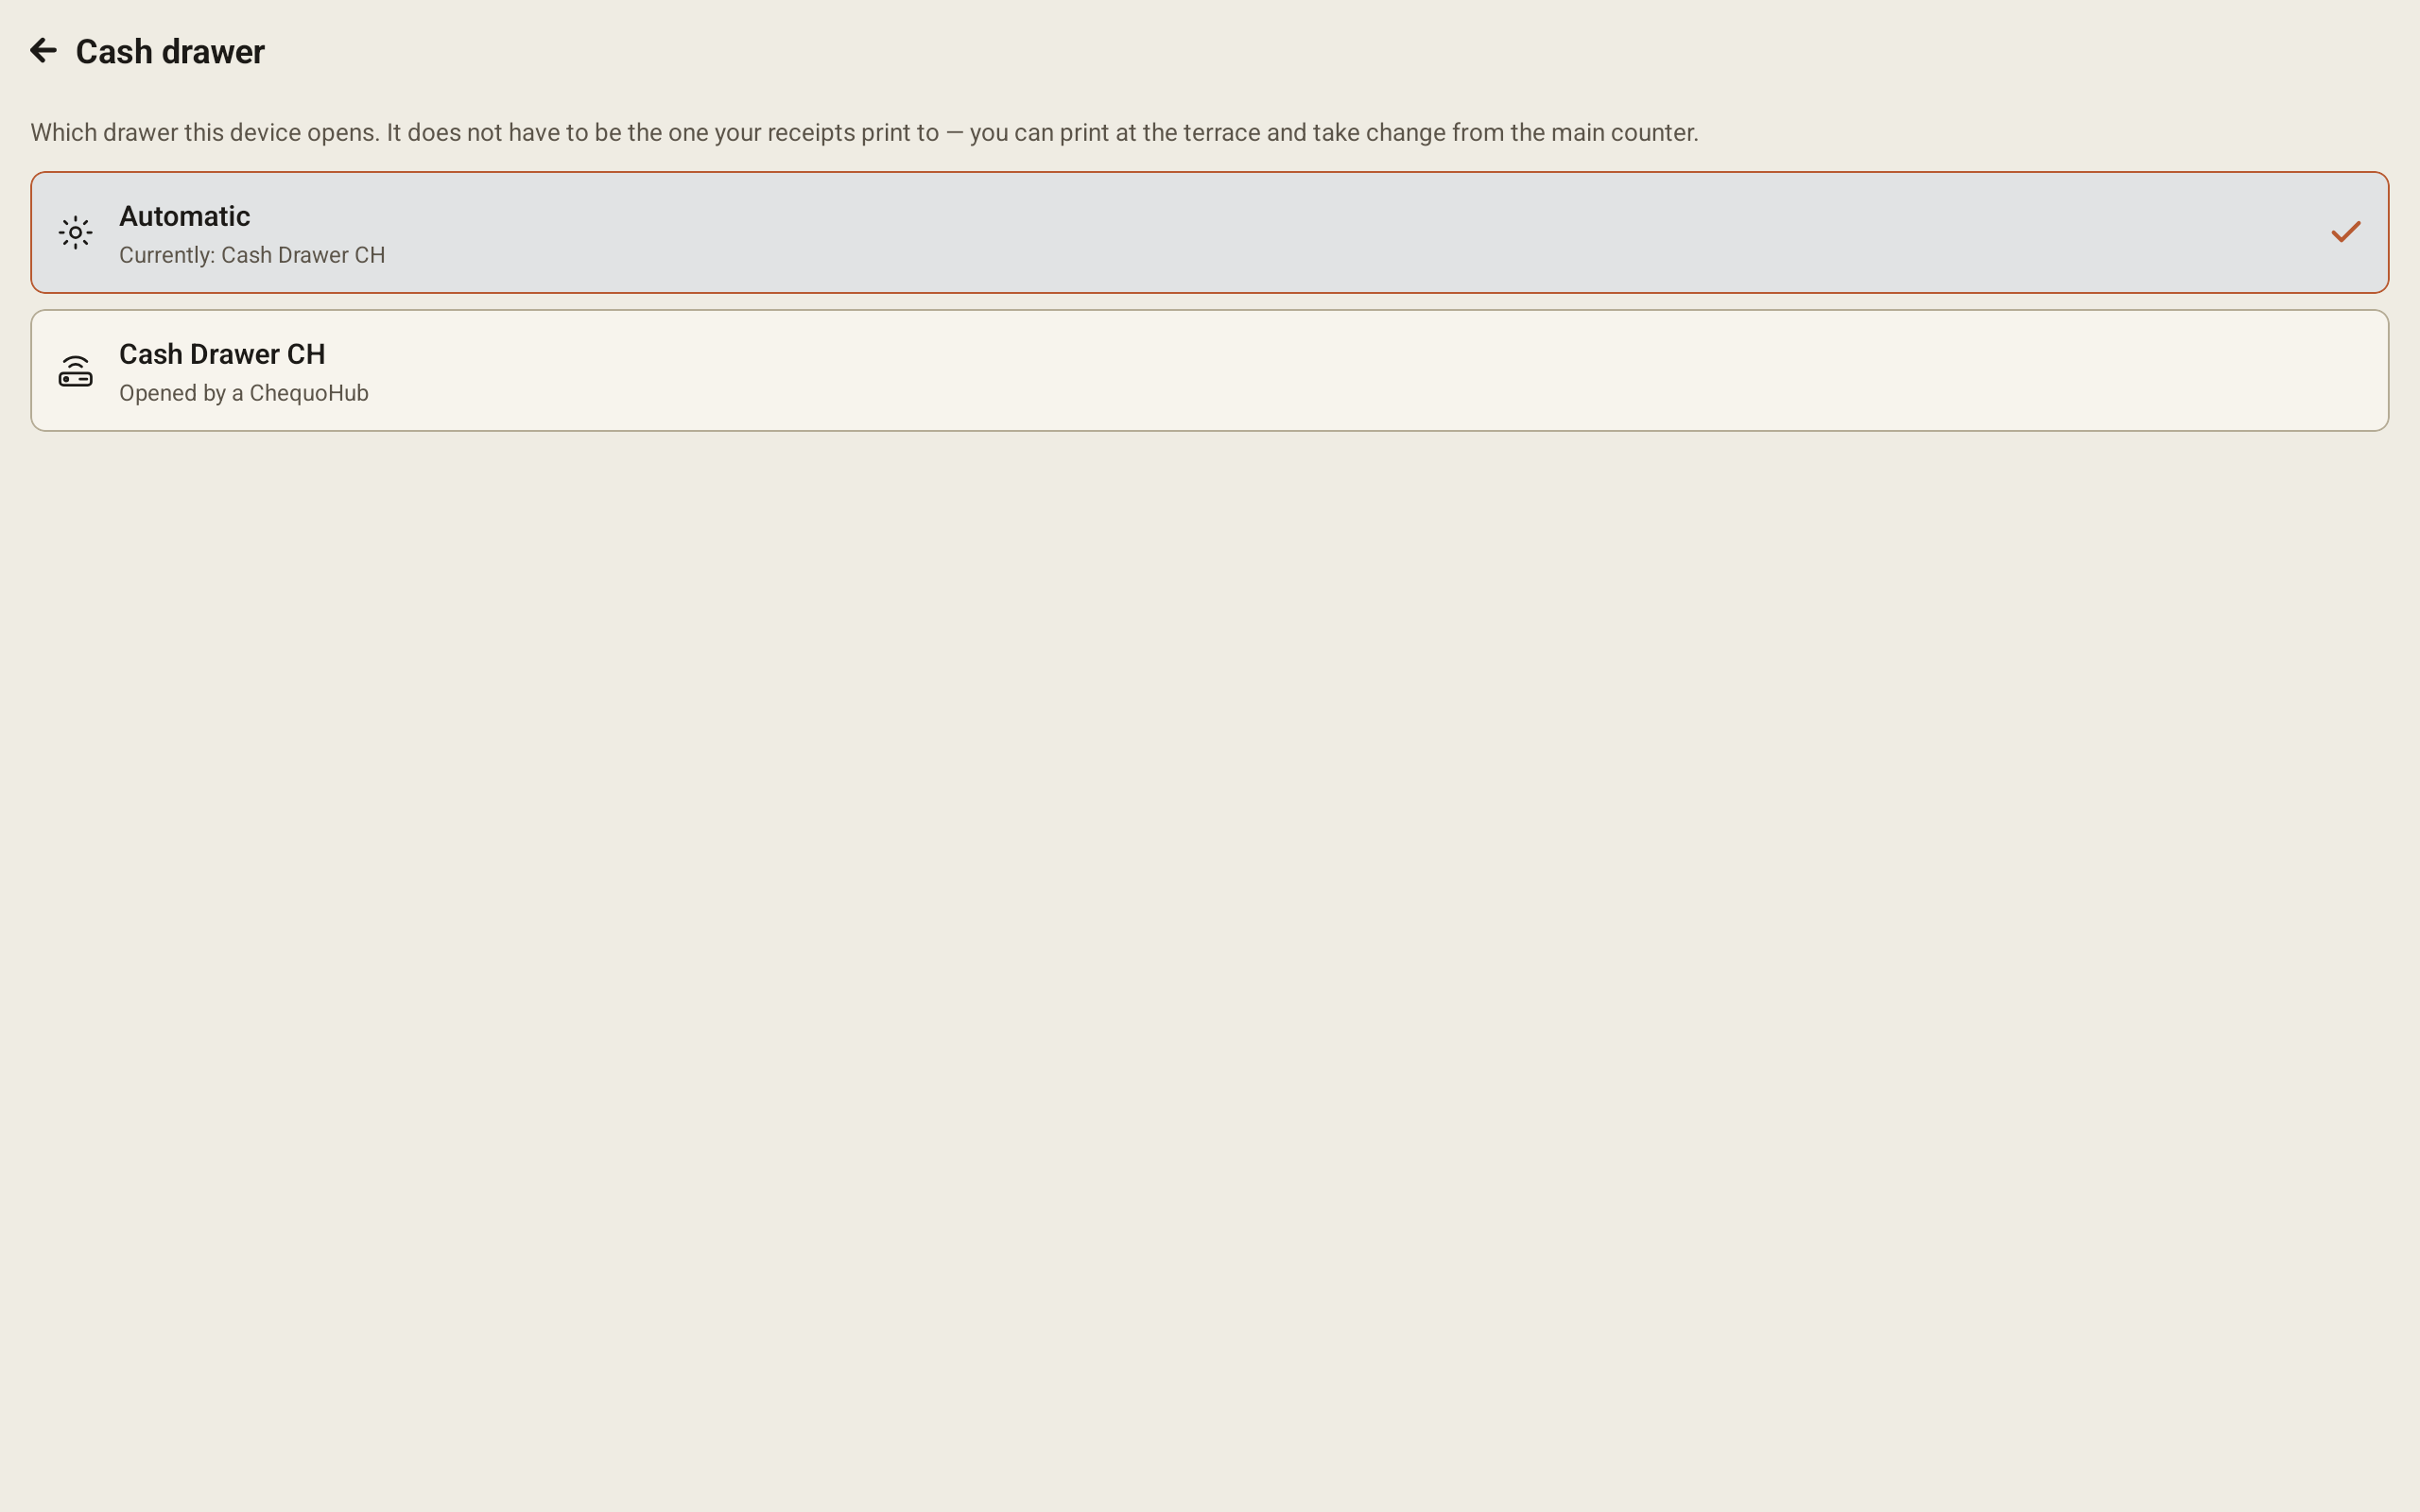
The choice is saved on this tablet only. Make it on each tablet that takes cash.
If the screen says there are no cash drawers set up yet, add them in the back office first, as described above.
For printers, see Adding a printer.